VOICE Home Page: http://www.os2voice.org
Newsletter Index
< Previous Page | Next Page >
Feature Index

VOICE Home Page: http://www.os2voice.org |
February 2005
Newsletter Index
|
| By Wolfgang Draxler © February 2005, Translation: Stefan Seyfert |
This article expains how to install and use UnixODBC under OS/2. MySQL is used
as the database and StarOffice 5.1 as application. It is
recommended to know and install both products.
First of all download UnixODBC-driver on Hobbes
(approx. 3 MB) in a directory. Decompress the zip-file and start install.exe.


These two windows will be displayed, press Continue and the following window will be displayed.

Press OK, and the next window appears.

Mark the components UnixODBC for OS/2 and LIBC05 for OS/2
with the mouse cursor or press the button Select all. Then
enter the directory where you want to install the components e.g., F:\OS2_System\ODBC.

Press the button Install. After a short moment you will see the following window:

Now press OK and restart the computer.
During installaition the folder unixODBC for OS/2 will be created on your workplace.

The installation of unixODBC is now finished.
As an example, we are going to embed the database
»Adressen« from the articles »In close collaboration:
MySQL and OS/2« into the ODBC system. Start the
program named ODBC Administrator.
After a short moment you will see the following window:

Press the button Add.

Now type in »Adressen« into the field Datasource name and Description. As driver choose in the list window the term »myODBC3«. Press OK and the next window appears.

Now click on tab Connection.

Enter the following data:
Host: the IP address of the computer on which the
MySQL-Database is running, e.g., 127.0.0.1 or localhost.
It might be that localhost does not work propperly in every
case. 127.0.0.1 is recommended.
Port: Type in the port of the database. Default port is 3306.
Database: Type in the name of the database, e.g., Adressen.
User-ID: Type in the user-ID. Here the user »Root« is used, but it is recommended to create a different user name in the MySQL database.
Password: Enter the password of the above mentioned user.
Statement: Enter a parameter for establishing a connection. So far, it is not necessary to insert anything as one can see in the above window.
After correct input, press Test Connection and a window displays the connection properties.

Remark: After PASSWORD= your above mentioned password
appears.
Press OK and after the connection could be established, this window appears:

If this window is shown, press OK. In case an error occurs, e.g., user does not exist, the following message is displayed:

Press OK, as well, correct the settings and try again to establish a connection until it works properly.
Then press OK in the property setting myODBC DSN Configuration. Now the connection will be included into the system list within the window ODBC Data Source Administration. The connection is now known to the ODBC system and can be used from other programs.
It looks like this:

You can now terminate the program by pressing OK.
Next start the program ODBC Data Manager. The tree view displays the existing connections.

In the structure System DSN you find our example
database connection »Adressen«. By double-click on Adressen
you will
find additional informations, such as table structure. Unfortunatly,
this does not work perfectly yet. The way it should be
you can see when you double click on SampleText or SampleDBF.
Now all informations about the table, rows, field type,
etc. are shown. Hopefully this will be corrected in the next version.
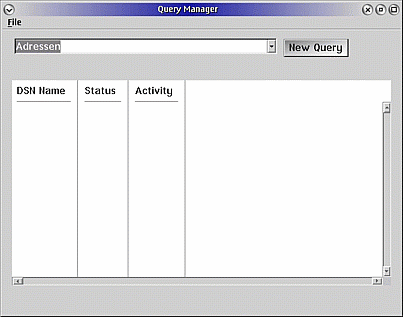
Please start the program SQL Query. This window appears:

In order to establish a connection to the Adressen database you have
to choose Adressen in the list window and press New Query.
Now the text Adressen appears under DSN Name,
under Status the text connected and under Activity the
text Waiting. A new window is displayed.

In this window you can enter several SQL commands and execute them. We will try this. Now type in the following SQL command in the upper part of the window:
select * from land
Then choose Query -> Execute.... in the menu. In the lower part of the window a list of the stored lands is displayed.

Here you can enter all SQL comands available for the database. Moreover, SQL statements can be saved or restored and results be saved via the menu File. As this program is used for test purposes, let's have a look at an example with StarOffice 5.1.
Start the program, choose the menu item File->New->Database and in the new window enter the StarOffice name of the database connection.

On the next page...

...enter the type of database here: ODBC, and the data source, here: Adressen. After you choosed the type of database you can also select the data source by clicking on Browse.... On the third page...

...enter the user ID and password. In the entry field Driver settings you can adjust driver parameters. Within the window Codepages the code pages can be selected. Default setting is System.

On the fourth page the tables of the database are listed, in this case the table Land. Confirm by clicking OK and the database connection will be saved.
Now you can use this connection in StarOffice. This means, you can make requests or create forms and reports.
Now I finish this article and wish all of you a happy new year.
References:
|
Feature Index
editor@os2voice.org
< Previous Page | Newsletter Index | Next Page >
VOICE Home Page: http://www.os2voice.org