
VOICE Home Page: http://www.os2voice.org
[Newsletter Index]
[Previous Page] [Next Page]
[Feature Index]

VOICE Home Page: http://www.os2voice.org |
November 2002
[Newsletter Index]
|
| By Thomas Klein © November 2002 |
Welcome back for the third part of our series which happens to take place "between the two Warpstocks". Before we move on, I have to say a few sentences (as usual):
Among last month's emails, there was one that stuck out from the rest, because - you won't believe it - it came from the desk of the developer of DrDialog (David C. Morrill), who I had tried to get in contact in vain while preparing the launch of my series. Well, one fine Monday morning his mail popped into my mailbox and it was not just very kind, but also positive (see this month's Letters, Addendum, Errata). I'm curious about what might happen in the future... (without raising false expectations or making anyone feel urged to do something).
If you happen to be a rexx newbie as well, you should make sure to have the rexx information at hand all the time as well. This file is called REXX.INF and usually it'll be installed into the BOOK directory during installation of OS/2 (or eCS). Actually, we're not using a lot of "pure rexx" now, but this will change in near future...
To make sure you're having help at hand in this early stage of learning rexx and DrDialog, you should provide yourself a reference (or "shadow") of those files in an easy-to-find place like WarpCenter, XCenter or Launchpad (or within a tray of these). Based upon personal experience, I'll strongly recommend the use of higher screen resolutions and large displays that'll allow you to run DrDialog along together with both help files opened... ;) You'll notice that you will need these files quite frequently - I still rely on them myself.
One final comment on this subject: I've noticed, that on my system, pressing
F1 from within DrDialog's design time environment will close the whole application
without any comment or message before the help file is opened. I don't want to deny
the possibility of this being caused by a possibly wrong configuration of *my* machine,
but you've been warned: Better use the corresponding command button from within DrDialogs
'tool bar' - this will do it just as expected.
call output.text("")
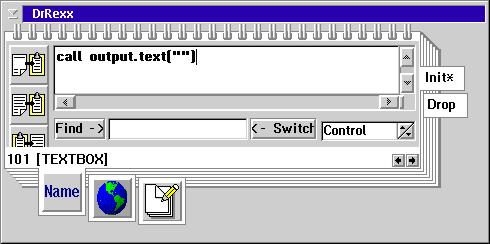 ...into
the INIT event routine of the textbox. This is done by (as you surely know by now)
double-clicking on the textbox, which invokes the code editor window, already displaying
the INIT event routine. So let's put out command (or 'method') there: You should
remove the same command that is still contained in the OPEN event routine of the
dialog to prevent it from being executed twice at startup. Okay, this won't cause
any errors, but it's just superfluous.
Leaving out the 'global main routine' we discussed last month, this will give us two events that are suited to 'empty' our textbox at startup:
Of course you're free to use the one you prefer, but let's take a close look on what is actually going on: The OPEN event is 'triggered' for the dialog itself, while the INIT event is triggered only for the textbox. As our command refers to only the textbox as well, we should prefer to use this event, because
The situation would be slightly different in a case where you have more than only one control that needs to be initialized and if you require some kind of saved information along with it (like INI settings). For self-documentary purposes you may want to prefer writing all commands in a single sequence, thus "outside" of one single control's INIT event. This can either be accomplished by writing the bunch of commands into the dialog's OPEN event or by calling a dedicated routine (that contains them) from within the OPEN event.
While deciding how to do things, you should always keep in mind, what actually happens behind the scene. First, the INIT event of the dialog takes place, next comes its OPEN event, followed by the INIT events of all controls contained in the dialog. From this point on, the dialog is deciding "on his own", which event happens next due to user interaction.
This will close the section on which events to use for "clearing" our textbox... let's move on by taking a closer look at the actual command statement - you'll like that one. ;) According to online help, the syntax of the text() function is this:
Okay. It's a function returning something ("oldText"). Heck! Why does the code example show something different...
Oh Lord - that's looking completely different from what it said above and also different from what WE wrote... Well, don't panic: The function "text" can be used in three different ways, depending on what you need and what you want:
If you only have basic elementary knowledge of the principles of object orientation (like me), you might come up with the question of this being an example of polymorphism. Let me tell it to you straight: I don't have the slightest idea. ;) The fact is, that you simply use the function call according to your needs:
For example, there's a textbox named OUTPUT which is part of a dialog called MYDIALOG and you simply want to know it's content, you do
The empty brackets indicate that you don't want to set a new content. Whereas if you want to know the content, but at the same time set a content of "Hello" (which of course takes place AFTER the 'old' content was retrieved), you must call it by using
Okay. Finally you don't want to know anything about the current contents but just want to put "Hello" in it. In this case, you don't need to supply any variable to hold the return value (the current/previous content):Content = MYDIALOG.OUTPUT.TEXT("Hello")
Of course you can use the first notation as well and simply don't care about the returned value, but by using the CALL notation, you provide an easily visible documentation about the fact that you don't intend to process the textbox previous contents in your program.CALL MYDIALOG.OUTPUT.TEXT("Hello")
I think now is a good moment to take a little break, enjoy a cup of tea and let the whole thing soak into your grey cells. ;) Feel free to read the above syntax stuff as often as you feel you need until you're sure you understand the differences. This way of different "calling schemes" refers to all functions in DrDialog that deal with controls.
The break's over? Can we go on? Okay: Now things get even harder. As you might know from other syntax diagrams, those square brackets indicate 'optional' parts. Thus, a statement like...
being removed of all 'optional' parts would become...
Oops? Now, what's that supposed to be? C'mon - that won't work! Nope - it works: As you might have noticed, the syntax is using a 'full qualified' scheme, containing both name of dialog and control whose "text"-function is called.
This is the one and only, complete, absolute, ever-working syntax. It's exactly the same as with specifying drive letter and path name of a file, like in "C:\CONFIG.SYS". This statement is unambiguous on your entire system, regardless of what drive you're currently on or what directory you're in. To stay with the file name example: If you find yourself within an OS/2 command window and the current drive letter is C: you don't need to care about the current directory when using "\CONFIG.SYS" to specify the file. In addition, if your current directory is the root directory of C:, even just "CONFIG.SYS" is sufficient to identify the file.
This is just as with the controls function calls in DrDialog: If you're located in an event handler routine that "belongs" to the dialog that contains our textbox (e.g. the dialog's OPEN event), you don't need to use the first optional operand "[Dialog]": In this case, the statement refers to the dialog, in whose 'context' it resides in. Just go ahead and try it by adding the following command into the dialogs OPEN event:
Oh, and don't forget to remove the initialization command from the textboxes INIT event - you won't notice much of the new command otherwise. ;) Well okay, you already know that form of syntax from the INIT-Example. You can use this notation from within any event handler routine of the dialog or any event handler routine of a control that is contained in the dialog. Let's get on by first removing the new command, then typing the following into the textboxes INIT event:call output.text("Dialoginit")
Again, run the program to see what happens... well? It works, but: It'll only work IN THIS PLACE, the INIT event of the textbox. You're now moving around in the "context" of the textbox, as the INIT event refers to the textbox only. If you try to put the same command in another place, it won't work any longer: Just for testing purposes, go ahead by typing the same command in the OPEN event handler of the dialog... what do you think will happen upon running the program?call text("Textboxinit")
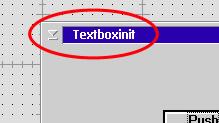
Holy moly! What's going on NOW? ;) A very simple explanation: The statement is now within the context of the dialog window (as the OPEN event refers to the dialog of course). By NOT supplying an optional [Control] operand, the statement will adress the dialog instead of the textbox. By chance, the dialog has got a text() function as well, but it's used to set/get the dialog's window title text. And this is what happened here. In the case of the dialog NOT providing a text() function of its own, DrDialog would have come up with an error message stating that no routine or function named "text" was found.
So what can be learned from this behaviour? A simple scheme: If you refer to a control's function, you don't need to supply either dialog or control name, as long as you're moving around in an event routine of that same control. If you're referring to a control's function from "outside", you only need to specify it's name as long as you find yourself in routines of the dialog that contains the control. Whereas if you find yourself in another dialog than the control you're intending to refer to (or within a 'global' routine), you need to use the fully qualified naming scheme of the function: Dialog name, control name, function.
Let's get back to our sample program: From what we've learned above, the only thing we actually need to do to clear our textbox contents is specifying
in the textboxes INIT event. Phew. Think it's time for something 'harder' than tea, right? ;)call text("")
Next month we'll start to introduce the most important (or most frequently used) properties of the controls that make up the "basic elements" of graphical user interfaces. This includes the following:
|
|
|
|
|
|
|
|
|
|
Actually, the 'combo box' does not belong here as it simply is made of a list box along with an entry field, but it has some additional properties and therefore needs to discussed on its own...
Well, there's scrolling bars and bitmaps missing, as well as a lot of others that I don't even know now, but those fellows mentioned above are the 'real' basic interactive parts of graphical user interfaces that you'll encounter on every system, regardless if you're facing a Mac, Windows, Linux, OS/2 or even a graphical DOS interface. Of course, the graphical representation of these components will differ between platforms, but from their functional point of view, they're all the same.
Unfortunately, I can't keep my promise from last months issue: There won't be a second dialog in our sample program. But there will be a 'sneak preview' on next months subjects, as we'll now extend our program's functionality by adding a LIST and an ENTRY FIELD.
Up to now, our little program does nothing really magic. Clicking on a pushbutton always shows the same text. How boring, no processing. Let's figure out some goals:
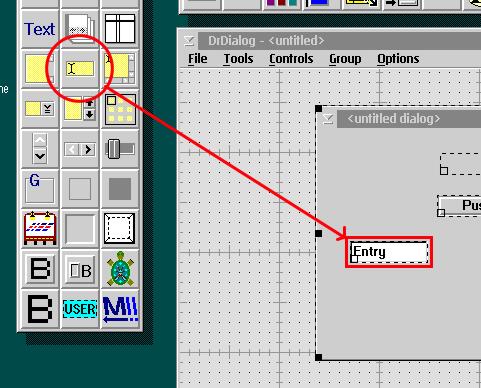 Let's
start with the easy part: The entry field. Search for a free spot on your dialog
or enlarge it if necessary. Drag an entry field control from the controls selection
to your dialog
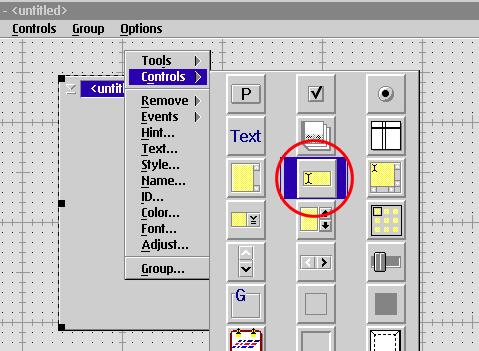 or
select the entry field control from within the dialogs context menu.
Text entry field has a default content as well, as you might have noticed. You're
free to change or remove it by using one of the ways that we discussed earlier in
the series regarding the textbox.
call text("")
Now let's take a look at lists. They are divided in either "classic lists" or "combo boxes", with the latter made up of different styles and thus appearance/behaviour.
Example of "classic list":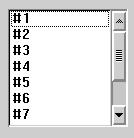
Example of Combo Box: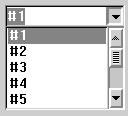
The combo boxes can be further divided (as I said above) into different types that either have a visible list part or an drop-down list part as well as they provide a combined entry field that either works as a "full" entry field or just as a search string entry field used to jump to corresponding entries in the list part.
In DrDialog, a combo boxes final appearance and behaviour is determined by its 'style'-property, however we always use the same control iconsimple
drop down
drop down list
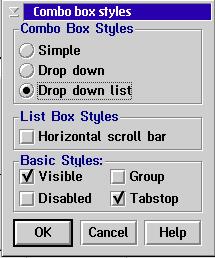 Now
we're about to specify that the combo box will be used to only select predefined
entries and does not use any entry field. From the combo boxes context menu select
'style', then select the 'Drop down list' option within the style dialog window:
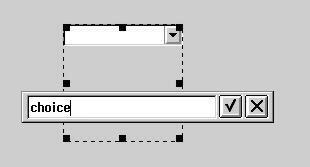
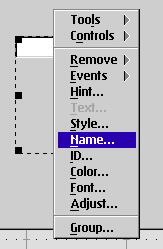 And
again, name the control... how about "choice" ?
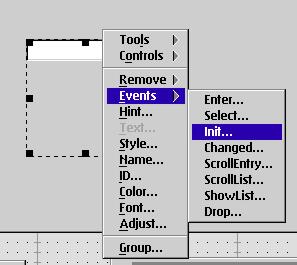 And
that's all we must do at design time. All that's left will be done at run time.
That's to say, first define content of the combo box. This is something that only
needs to be done once - at startup to be exact. Well, this even "smells"
like something suitable for an INIT event, doesn't it? ;) And it's true in fact
- so let's jump to the code editor's window for the combo boxes INIT event... ...and
let's see how to add entries to a list:
Hmmm. Difficult stuff... there's such a bunch of different and useful functions implemented in this command, that it'll leave you dazzled at first. A hint: We just want a very, very simple "ADD" into an empty list box (or combo box to be exact) without any special considerations in matters of sorting or sequence. So what does the syntax look like, if all 'optional' parts (those who're enclosed in square brackets) are removed?result = [dialog.][control.]Add( item [, "Ascending" | "Descending" | "Last" | n] [, data] )
Yep! Now that looks a lot better. ;) As you might notice by now, I've left the optional qualifying operands [Dialog] and [Control] out as well. That's no problem, because we're about to use the statement from within the combo boxes context, as we're right in the INIT event of the combo box. If we decide to not need the actual index of the new entry after it was inserted into the list (because there's no use for it in our example), we can also get rid of the return value, thus using the CALL notation:result = Add( item )
Fine. We would like to include the following entries in the list: Hello, Salut, Ciao, Hola and Hallocall Add( item )
This is done by typing the following sequence into the INIT routine:
One little problem with lists is, that once they are intialized, they might be full of entries, but none of them is 'selected'. Trusting in the user being careful enough to select an entry from the list prior to click the button could make your program fail. Thus, we need to make sure that there's a selected entry before we're 'processing' it. Of course, each time prior to processing, we could check if there's selected entry, but this is waste of time if you know that this type of list box or combo box has no selected entry only at startup. Once an entry was selected, it can only be unselected by selecting another one - <grin> - so the problem of no entry being selected only exists at program beginning. And the most simple solution to it is pre-selecting an entry that the user might want to change if it's not suitable. To accomplish this, we make use of the function 'Select':call add("Hello") call add("Salut") call add("Ciao") call add("Hola") call add("Hallo")
Sigh - to speed up things:result = [dialog.][control.]Select( [index [, "Select" | "Unselect" | "Next" | "Top" ] ] )
Yeah, okay - this time, there's one optional parameter that I did not remove. This is because 'select' supports both GET and SET values, just like the text()-function does. Because we don't want to GET the index (number of entry in list, 1 being the 1st entry and so on...) of the selected entry, but rather SET the index to select an entry, we need to specify the index of that entry we want to select. We simply select the first entry in the list. Thus 'index' is 1. On the other hand, we don't care about what entry was selected prior to our command, because we know there wasn't any - so we don't need any return value and use the CALL notation instead:result = Select( [index ] )
This is what you should type into the combo boxes INIT event, right after all entries were added. And that's all for the startup stuff - the only thing left to complete the program is changing the output command that's contained in the CLICK event routine of the pushbutton. We aim at having the selected entry of the list being used in conjunction with the name entered in the entry field, just like incall Select(1)
Hello world.
First, let's take care of finding out what entry was selected when the push button is clicked. As we just got to know, the select() function is capable of doing so by returning the index of the selected entry, once we use the notation that uses a return value:
result = Select( [index ] )
As we don't want to select any entry, we'll leave the optional parameter...:
But hold it! ;) Where are we about to type this command? In what context? We're not dealing with something that takes place in a routine referring to the combo box, but rather the CLICK event of the Pushbutton! As both pushbutton and combo box reside within the same dialog, we can leave that part and just need to specify the combo box control's name. As we did name it 'choice', our command must look like this:result = Select()
result = choice.Select()
The 'result' variable is provided by rexx automatically if it did not already exist and holds the index of the selected entry upon function completion. Er, pardon, 'Index'? We don't need the index, we need the ENTRY! After all, we don't want to have "1 world." displayed, but "Hello world."! After crawling through DrDialogs online help, we'll find out that it's a function called 'Item' that apparently accomplishes this task:
Well, I'll save you from explanations of all the features that are implemented into this function and go on by simplifying like this...result = [dialog.][control.]Item( [index [, "Value" | "Data" ] [, value] ] )
Or, to stay with our example:result = [control.]Item( [index ] )
Now we just need to replace [Index] by the return value ofresult = choice.Item( [index] )
and that's it. Of course, you're free to save all single return values in appropriate, dedicated variables like...result = choice.Select()
...and go on by processing the 'greeting' variable, but why wasting time? As the select() function returns an Index and item() requires an Index, we can simplify the whole stuff by doing:number = choice.Select()
greeting = choice.Item(number)
After having discussed this subject, let's face the entry field stuff. Well, that's not too complicated because we know the text() function from the syntax discussion we did at the beginning:greeting = choice.Item( choice.Select() )
Which we'll adapt tooldText = [dialog.][control.]Text( [newText] )
because our entry field's name is "input" and as we're not within the context of the entry field, but in the CLICK event of the pushbutton, we need to supply the name of the control whose 'text' function we refer to.greetname = input.Text()
Now we have all means to retrieve the selected entry as well as the name entered into the entry field. All that's left is to 'concatenate' both values to make up the final greeting message we want to be displayed. To put strings together into another one (called 'concatenation') we'll rely on rexx built-in 'double pipe' notation:
In our example, this refers toText3 = Text1 || Text2
Before we move on, let's recall a brief overview on what we all need to do in the CLICK event of the pushbutton up to now:displaytext = greeting || greetname
The concatenation will put both strings 'really together', which means that it will return a string like 'Helloworld' - nah, that's ugly. Let's put some space characters into it and - while we're at - the final full stop ("."):greeting = choice.Item( choice.Select() )
greetname = input.Text()
displaytext = greeting || greetname
That's better. So this is, what we put into the CLICK event routine of the pushbutton. Finally, we need to change the actual display command fromdisplaytext = greeting || " " || greetname || "."
intocall output.text("Hello world!")
Now, that's a cool program. If you're not too tired, we can give it a try on "simplifying" the whole thing and getting rid of 'superfluous' variables. From your math lessons, you do remember what an equation is? Of course. Actually, assigning a value is done by using an equation and this means, thatcall output.text(displaytext)
is nothing more or less than saying "the contents of 'displaytext' on the left is the same as what comes out of the function on the right". Based upon this, we can substitute 'displaytext' by the concatenation command:
can be equally written as
so we don't need 'displaytext' any more. Our command sequence thus looks like:
BEFORE:
AFTER:
If you like simplifications like this, you might want to top the whole thing by replacing both 'greetname' and 'greeting' by their functional counterparts respectively and the whole processing sequence can be shrinked into a one-line command that looks like...greeting = choice.Item( choice.Select() ) greetname = input.Text() call output.text(greeting || " " || greetname || ".")
This is what comes out if you replace all 'intermediate variables' by the actual functions that gave them their values. If you're in trouble but really feel the need for understanding what this is about, you're free to read this whole section on simplification over and over again, proceeding step by step - this helps. If you don't manage to understand what it's about: Who cares - you're free to use the 'intermediate variable' way with the value assignments. In addition, things look 'easier' to follow, providing better self-documentation at first sight and after all, the times when each variable in memory did cost money are definitively gone. ;)
Desiring homework? Go ahead and play with that "new" program. You might happen to notice, that leading spaces in the entry field will lead to equally inserted spaces in the output text...
Example: "Peter" is entered as " Peter" (three leading spaces) Output: "Hello Peter."
...and you might want to check the rexx manual for the strip() function - don't worry, there's no parental advisory, ;) to see what possible use it could bring into our sample application. Don't force yourself too much to do complicated things and use the "unsimplified" four line version of the CLICK event routine. The solution will be published in next month's issue, right before we brgin taking a closer look on the major controls and their attitudes, pardon, attributes.
Dear audience, once more the time has come to say goodbye... but wait! Not for long, maybe as we might meet sooner than expected: Come to Arnhem and Warpstock Europe 2002. If you like, meet me at the VOICE booth to discuss what I could improve, what your sore spots in matters of DrDialog are, or maybe even to talk about some current problem that you're faced with in working with DrDialog. Of course I'll be bringing my notebook computer with me and if there's some spare time left, I would appreciate clicking through DrDialog with you.
So: See you at Warpstock Europe!
References:
|
[Feature Index]
editor@os2voice.org
[Previous Page] [Newsletter Index] [Next Page]
VOICE Home Page: http://www.os2voice.org