
Active GUI element
Static GUI element
Code
WPS object
File/Path
Command line
Entry-field content
[Key combination]
Exploring Feature Install
Part 1: Object-Based Installation
Mention Feature Install, and most OS/2 users immediately think of the annoying web browser front-end that many IBM products (like Java or TCP/IP) inflict on them during installation. But this is really an unfair perception: Feature Install itself has nothing to do with web browsers at all.
OS/2 Feature Install is an extremely flexible installation toolkit which is integrated into the Workplace Shell itself. It was designed to provide an installation engine for software products to use while leaving the product developers free to provide their own user interface for the install process. In other words Feature Install is a generic installer “back-end,” and it's up to developers to provide whatever “front-end” they see fit.
Apparently, IBM likes HTML-based user interfaces, so they chose Netscape as the front-end for installing their own products. This is done through a web browser plugin which interfaces with the Feature Install engine. But neither this plugin nor the web browser should be considered an integral part of Feature Install. It's perfectly possible to provide a different front-end entirely.
Nonetheless, we often find ourselves having to deal with various IBM products that require the use of Netscape to install. It's particularly annoying because the browser plugin requires Netscape 2.02 or 4.x; Mozilla does not (and will not) support it. Given how outdated Netscape is by now, many users resent having to install this old software on their systems. In addition, the browser interface is notoriously slow, quirky, and is sometimes prone to mysterious hangs and crashes. Wouldn't it be great if we could dispense with it altogether?
As it happens, we can.
In a Netscape-Free World
There are a couple of ways to install IBM's Feature Install-based products without requiring Netscape.
Unattended Mode (CLIFI)
The most obvious way is to use the unattended mode (also called CID mode), which most of these products support. I may describe this process in more detail in a later article, but I'm only going to touch on it here.
For products that support it there are usually instructions for unattended installation buried somewhere in the README documentation. In most cases it involves using CLIFI.EXE, which comprises Feature Install's command-line interface. You typically have to create a text script called a response file which you then pass to CLIFI.EXE to launch the installation from an OS/2 command prompt.
This method can be extremely useful for experienced system administrators or for developers who want to write their own customized front-ends. However, it does require a certain amount of technical skill. Fiddling with response files can be complex, and frequently requires a lot of tedious digging through documentation. CLIFI.EXE's command syntax is also rather arcane. And there are one or two products (such as VisualAge C++ 4.0) which don't provide any documented support for this method at all.
All this can seem a bit much to the casual user who just wants to quickly install the darned product and get on with life.
Using Desktop Objects
But there is an easier way. Earlier, I mentioned that Feature Install is integrated into the Workplace Shell. What this means is that all of the installation data for each Feature-Installable product is stored in a special kind of desktop object called an Install Object. Normally, the web browser plugin (or CLIFI) creates and manages these objects behind the scenes. But it's actually possible for you, the user, to use these desktop objects directly to manage the installation process. No web browser, no CID commands… just point, click, and install!
OK, maybe it's not quite that straightforward. But it's not all that difficult, either, at least once you understand the technique.
The Install Object
If you've ever installed any Feature Install products (Warp 4 and up automatically install several such products as part of the operating system), you can use the Workplace Shell to open the folder \OS2\INSTALL\Installed Features, and take a look at its contents.
Here's an example of what it might contain (taken from an eComStation 1.2 system):
Figure 1. Standard content of the \OS2\INSTALL\Installed features folder [Larger image]
Each of the objects in this folder is an Install Object (WPS class WPInstall) representing a product that's already been installed. If you double-click on one, you see a tree of the various components that were installed as part of the product.
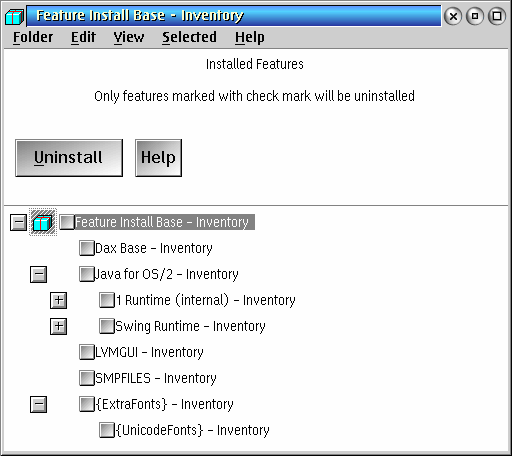
Figure 2. Standard content of the Feature Install Base install object
If you open the object properties from its context menu, you can browse through the various settings that define this product (such as directory names, configuration file changes, files copied, and so on). You can even use these objects to uninstall all or part of the product.
However, Install Objects aren't just used to represent products after installation. The actual installation process also uses Install Objects although they are usually hidden from you by Netscape. In fact all Netscape actually does with its plugin (or CLIFI, if you use that) is create an Install Object, populates it with the specific data for the product being installed, and then tells it to go install itself.
Some Basics
At this point I need to go over some basic concepts. Every Feature Install product, and every selectable component of that product, is known as a feature. The product as a whole can be referred to as the top-level feature, and each selectable component as a child feature. However, child features can be nested to an (apparently) arbitrary number of levels. So each component of a product can have its own sub-components; in other words, child features can have their own children, and those can have children of their own, and so on.
Each feature, whether top-level or child, is represented by an Install Object. What this means is that Install Objects are hierarchical, just like directories. If you look at the tree of components in the above example, each of those tree nodes is itself an Install Object located inside its parent object in the same manner as a WPS folder. (In fact, for those who are interested, the Install Object class is a subclass of the standard WPS folder class.) This characteristic of Install Objects isn't terribly important to us now, but it may be in future articles.
For our present purposes we'll mostly just be working with the top-level Install Object, although we'll need to be aware of the child features when it comes time to select components for installation.
Installing with Objects
Now we know what Install Objects are. So how do we use them to install a product?
Broadly speaking, the process consists of five steps:
- Create an empty Install Object.
- Load the product definition data into that object.
- Set the required product variables.
- Select the product components to install.
- Start the installation.
Creating an Install Object
The first step requires us to create a generic, empty Install Object. This means creating a desktop object of class WPInstall. Anyone who is familiar with OS/2 REXX could write a two-line REXX script to do this. But that's not necessary since Feature Install includes a simple command that does this for us; it's part of the CLIFI program. Although we aren't using CLIFI for the actual installation, we can use its simplest invocation syntax to create ourselves a blank Install Object (so we don't have to bother with REXX).
The command is:
CLIFI /A:T

Figure 3. A freshly created Install Object template
exactly as typed. If you're curious, the /A switch means “action” (telling CLIFI what function it's performing), and T is short for “template” (no relation to desktop templates here; in this context it just tells CLIFI to create a generic Install Object on the desktop).
You should end up with an Install Object on your desktop (it looks like a little blue package), named, appropriately enough, Install Object.
Reading the Product Definition
Now we need to load the product definition of whatever it is we want to install.
One of the neat things about Feature Install is that the complete definition of each product, containing all of the data needed to install and configure it, is contained entirely within a single ASCII text file. I'll be referring to this file as the product definition response file. You may also see it described elsewhere as the primary response file, or the feature install response file.
You'll generally have to find out for yourself where this file is located and what it's called. It always has the extension .RSP, is invariably large (typically over 100 KB, and often many times that), and is usually located either in the top-level product directory (along with the README and the various HTML files used by Netscape), or else in an immediate subdirectory. If the product contains multiple language versions, it may be in the subdirectory corresponding to the language you want to install.
Some examples:
- For Java 1.3.1, the file is xx\JAVA131.RSP, where xx is the language code you want (e.g. EN for English, DE for German, etc.); this path is relative to wherever you've unzipped the Java files as downloaded from Software Choice.
- For TCP/IP 4.3.2, the file is TCPIP\INSTALL\TCPINST.RSP, relative to wherever you've unzipped the files from Software Choice.
- For the IBM C/C++ Compiler 3.6.5, the file is COMPILER\PORTAPAK.RSP, relative to the root directory of the install CD.
- For IBM VisualAge C++ 4.0, the file is VACPP\VACPP.RSP, relative to the root directory of the install CD.
(If the product includes CID installation instructions, these should mention where you can find this file; it's the same file you would specify using the /R: parameter when installing with CLIFI.)
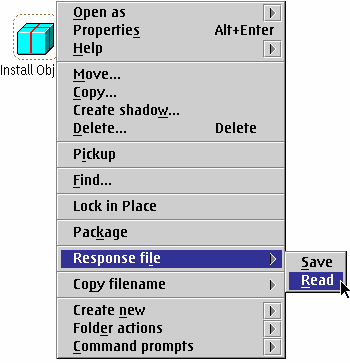
Figure 4. Install Object context menu
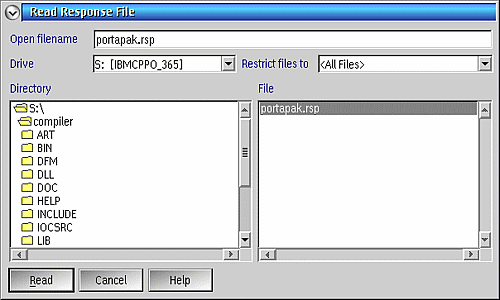
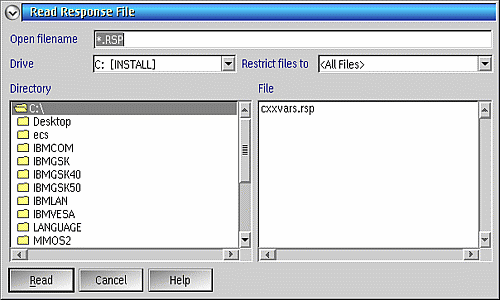
Once you've found the right file, you must load it into your Install Object. Do this by right-clicking on the object, selecting Response file from the context menu, and choosing Read. You then use the file dialog that comes up to select the response file.
In the examples that follow, I'm going to be installing the IBM C/C++ Compiler 3.6.5 (that comes included in the VisualAge C++ 4.0 package).
The product definition response file is \COMPILER\PORTAPAK.RSP on the installation CD-ROM. So, after creating an empty Install Object, I right-click on it and select to read a response file (as described above). On the file selection dialog, I browse to my CD-ROM drive and locate the file:
Figure 5. Selecting a response file for reading [Larger image]
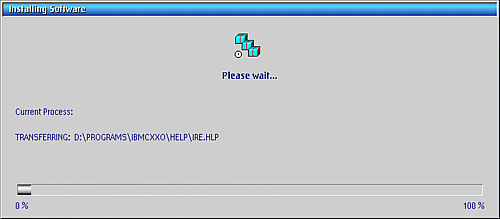
When I click on Read, the following message appears:
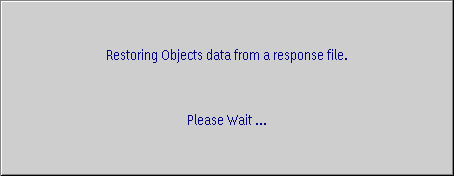
Figure 6. Status message when reading the response file
Once the Install Object finishes reading the response file, its title changes to whatever is defined in the product response file. In the case of the C/C++ Compiler, this is the rather cryptic name PPAK_FI. Well, whatever.
Now, if I double-click on the Install Object, I'll see the various product components listed, with checkboxes allowing me to select or deselect each one. I'll be doing that in a moment, but first there's another important task to perform.
Identifying the Product Variables
Any installable product has various options associated with it. Feature Installer separates these options into two types: selectable components (a.k.a. child features), and other variables.
The selectable components we'll deal with shortly. The other variables typically include the drive and directory into which the product is installed, the location of the product image files, and may also include other things that are specific to the product. Before we can install a product, we must determine whether or not we need to modify any of these variables.
First, we have to find out what variables are actually defined. We do this by right-clicking on the Install Object and choosing Properties. All of the variables defined by the product are listed on the second page of the properties notebook, called Variables:
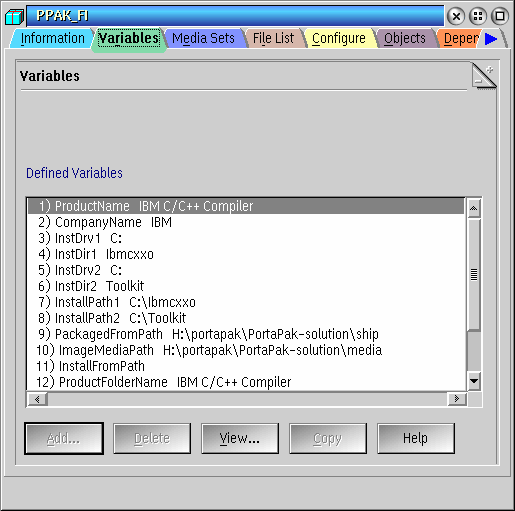
Figure 7. Install object settings notebook with defined product variables
Don't be intimidated by the large number of variables listed. Most of them you'll never need to worry about.
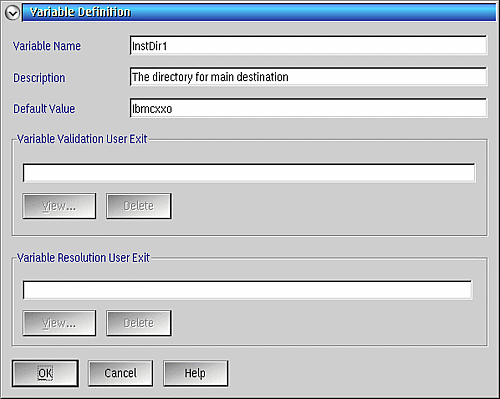
To see what I mean double-click on a couple of variables, or select the View button. This brings up a dialog that describes each variable in a bit more detail:
Figure 8. Detailed view of an Install Object variable [Larger image]
In this example I'm viewing the variable InstDir1 for the IBM C/C++ Compiler. This variable defines the main target directory for installation; the default value is IBMCXXO. The drive letter is not specified here, because that's defined by another variable (as you can see if you look back at the variable list) called InstDrv1.
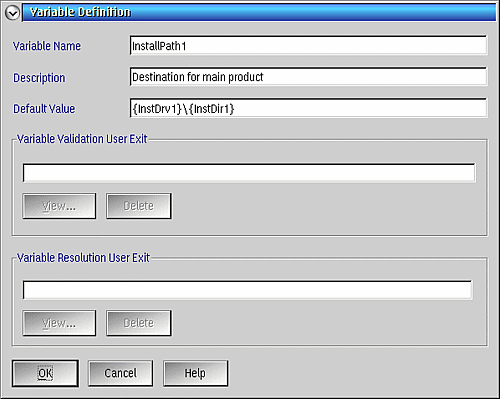
Now I'll take a look at the variable called InstallPath1:
Figure 9. Detailed view of InstallPath1 variable [Larger image]
As you can see, this variable is defined simply as the concatenation of the variables InstDrv1 and InstDir1, with a backslash in between. (You can recognize a variable reference by the fact that it's enclosed inside curly braces {}.) In other words it's defined entirely in terms of other variables.
In general you'll find that only a handful of variables have independent values. Most of the other listed variables ultimately derive their values from this small group, and you can almost always ignore them.
In addition there are often a number of variables that you don't want to change anyway. These are generally internal to the install process. For example, the IBM C++ Compiler has a variable which defines the name of the product's own INI file (CXX36.INI). I can't think of a reason why anyone would want to change this.
Feature Install itself defines a couple of universal variables as well; the most common one you're likely to see is {BootDrive}, which always resolves to the system boot drive.
By the way, you may have noticed that these dialogs don't provide any way of actually changing the variable values. That's OK; all we're doing at present is information-gathering. I describe how to modify the variables in a bit; for now, we take note of which ones we need to modify when the time comes.
Figuring out what variables you need to modify is probably the most challenging part of installing Feature Install products in this way. The more often you do this, the more of a feel you'll get for identifying which variables typically need to be modified and which don't. In general, and especially when you're just starting out, the only ones you usually want to change are those which determine the target installation path.
The Media Path Variable (optional)
Now that I've said that, there is one more variable that you may want to modify: the one which defines where the product's install files are located. Remember, the install program is running as an object on your Desktop, and therefore has no real physical location. So it doesn't know where the actual product files are located until you tell it where to look.
I said 'may' in the preceding paragraph because Feature Install prompts you for the correct location if it can't find the files on its own. So this step is, strictly speaking, optional.
To figure out which variable you need to change, change over to the tab titled Media Sets. It should look like this:
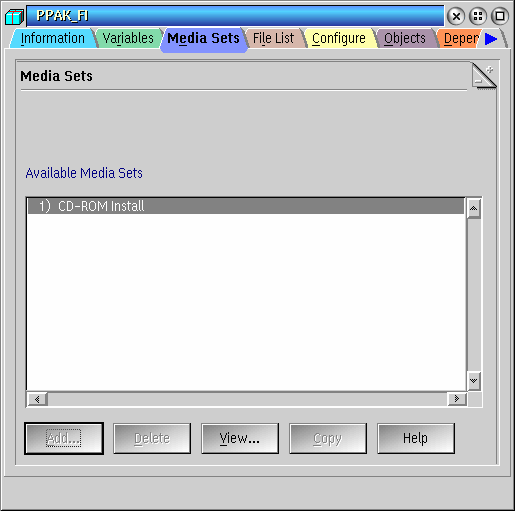
Figure 10. Install object properties, Media sets tab
This page shows all of the installation media that are defined for the product. Usually there's only one; in this example it's the installation CD-ROM.
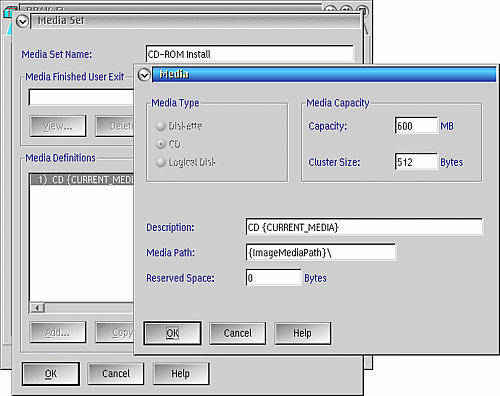
Double-clicking or selecting the View button gets you a dialog with the media details, including a listbox labelled Media Definitions. This contains the actual details of each item in the media set, which in this example is a single CD-ROM. (Products using a media set that consists of multiple diskettes or CDs would presumably list multiple items here. However, I've never seen this in practice.) Double-clicking on the media definition gets you another dialog:
Detailed view of media definition [Larger image]
The Media Path value is what we're interested in. This should contain the name of the variable (in this example, ImageMediaPath) that we need to modify.
If you go back to the Variables page, you should see that variable somewhere in the list. Its default value is probably something long and cryptic (in my example, it's H:\portapak\PortaPak-solution\media). The reason for the weird default value is that the same variable gets used when IBM is actually building the install package on their internal systems, and the old value tends to get left over in the published response file. When you use CLIFI or Netscape to install, this value gets overwritten automatically. It's only when we use Install Objects that we have any reason to modify it ourselves.
The behaviour of this variable is actually a bit unusual. If the Media Type specified on the Media Definition dialog (see the image above) is CD, then, at install-time, any drive letter that is included in the path value is automatically stripped off, and replaced with the drive letter corresponding to the first CD drive in your system. (Presumably, something similar happens if the Media Type is Diskette.)
So, in my example, let's say I leave the ImageMediaPath variable with the default value of H:\portapak\PortaPak-solution\media. When I start the install process, Feature Install automatically changes this value to S:\portapak\PortaPak-solution\media (since S: is my CD-ROM drive letter), and look for the product files there. If it can't find them, it prompts me to enter the correct path.
Note that Feature Install always seems to look for the product files on the first CD-ROM drive in your system. If you have more than one, and the installation CD isn't in the first one in drive letter order, you'll probably get prompted anyway, whether you try changing this variable or not.
Modifying the variables
So now we know which variables we need to modify, and (presumably) what we want their new values to be. But how do we actually modify them?
Unfortunately, you can't edit the variables directly in the Install Object. This seems like a strange limitation, but fear not: there are several other ways to accomplish the task.
Method A: Using Setup Strings
The Install Object is a WPS object much like any other. And like other WPS objects, it has certain basic features; one of these is the ability to be reconfigured using WPS setup strings. As it happens, every variable defined in an Install Object can be accessed as a setup string keyword.
Anyone familiar with OS/2 REXX programming knows how to modify object setup strings using the
SysSetObjectData() function. And you can certainly do that here and it works well enough. But not
everybody has the time, skill, or inclination to go writing REXX scripts for every small task.

Figure 11. A Setup String object
Anyone with XWorkplace installed (or eWorkplace, which is part of eComStation 1.1 and up) has access to what's
called a Setup String object. Just drag one out of your Templates folder to your
desktop, then open it and type in the variables you want to modify, with one keyword-value pair
(variable=value) per line.
For example, before installing the IBM C/C++ Compiler, I'd like to change InstDrv1 to D: and InstDir1 to Programs\IBMCXXO. So I can drag a Setup String object out of my Templates folder, open it, and fill in the values:
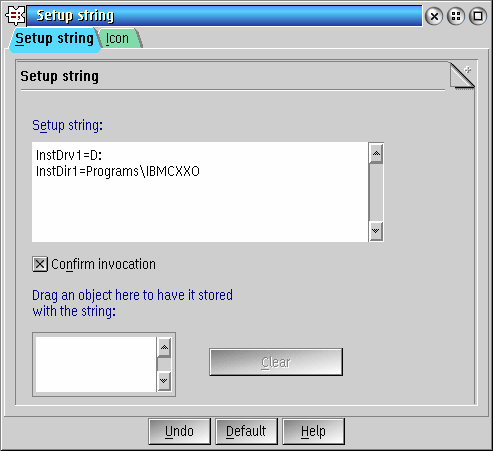
Figure 12. Setup String object properties with variable that are to be changed
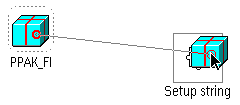
Figure 13. Dragging the Install Object onto the Setup String object
Now all I have to do is drag the PPAK_FI Install Object onto the Setup String object I created, and the variables I specified are updated instantly.
Going back into the Install Object's properties to check, we see that the values of these variables, and any others based on them, have been changed:
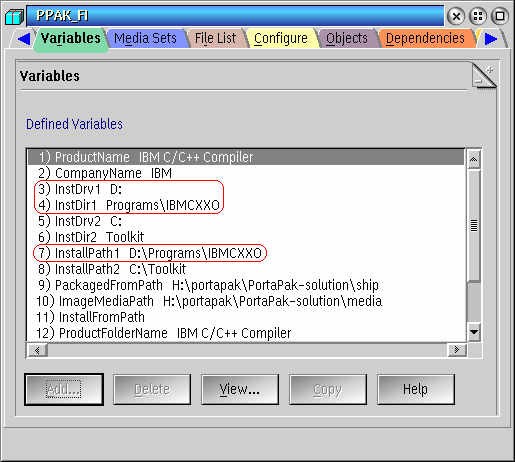
Figure 14. Install Object properties with updated variable values
So now the IBM C/C++ Compiler is installed to D:\Programs\IBMCXXO. (You'll notice I haven't bothered to change the Instxxx2 variables. That's because those are specific to the OS/2 Toolkit, and I'm not planning to install the Toolkit component anyway.)
If you don't have XWorkplace or eWorkplace installed, you can use a similar object provided by the Feature Install, which its documentation calls an Install Helper object. These are objects of class WPObjData, and they work in the same way as Setup String objects. The only difference is that an Install Helper object creates an actual text file to store the setup string data, and you use a text editor to edit it.
To create an Install Helper object on your desktop, run this REXX code:
/* OBJDATA.CMD */
CALL RxFuncAdd 'SysLoadFuncs', 'REXXUTIL', 'SysLoadFuncs'
CALL SysLoadFuncs
CALL SysRegisterObjectClass 'WPObjData', 'OBJDATA.DLL'
CALL SysCreateObject 'WPObjData', 'Install Helper.TXT', '<WP_DESKTOP>'
You may then open this object using a text editor, enter the setup string data in the same way you would with a
Setup String object (one variable=value pair per line), then save the file and drag the Install Object
onto the Install Helper.
For more information on using the WPObjData class, see Rich Walsh's OS/2 e-Zine article Using that Hammer and Screwdriver.
Method B: Using a Partial Response File
Alternatively, you can put modified variables into a text file, and load them from there. This text file,
which Feature Install refers to as a partial response file, must have a format of one
variable=value pair per line.
The variables specified are the same as the ones used in the setup string method above with one additional requirement: you need to prefix the variable name with the top-level feature ID of the product being installed. (This is the symbolic name of the product package as a whole, used internally by Feature Install.) You can easily determine this ID by looking at the first page of the Install Object's properties notebook: the ID is listed as Installation Feature ID. In the case of the C/C++ Compiler, the ID happens to be ROOT.
So, in this example, I can create a text file called CXXVARS.RSP (the filename is unimportant, but it should have the extension .RSP) with the contents:
ROOT.InstDrv1=D:
ROOT.InstDir1=Programs\IBMCXXO
Now we just read this file into the Install Object. You remember how to do that? Just right-click on the object to bring up its context menu, then choose Response File > Read, and select your partial response file.
Figure 15. Selecting the partial response file [Larger image]
The Install Object's variables is updated according to the values in the file.

Figure 16. Install Object properties with updated variable values
Selecting Components to Install
The rest is easy. If you open the Install Object by double-clicking on it, you see a list of the available components (or child features):
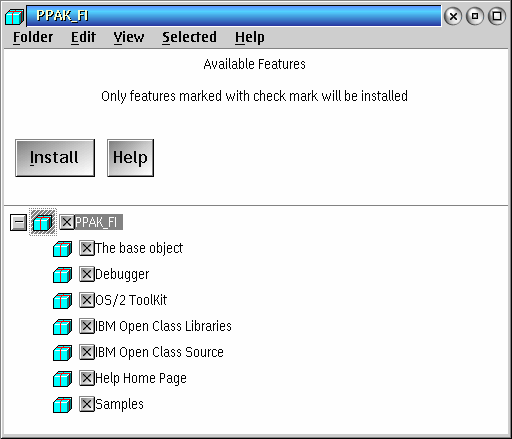
Figure 17. Selection dialog for featurees to install
This looks a lot like the contents of the objects that represent previously-installed products (which I discussed near the beginning of this article). The only difference is that the main action button now says Install (rather than Uninstall).
Simply select the components you want installed by using the checkboxes next to each one.
Installing the Product
Once everything is configured to your satisfaction, simply click on the Install button. You'll get a confirmation dialog that looks something like this:
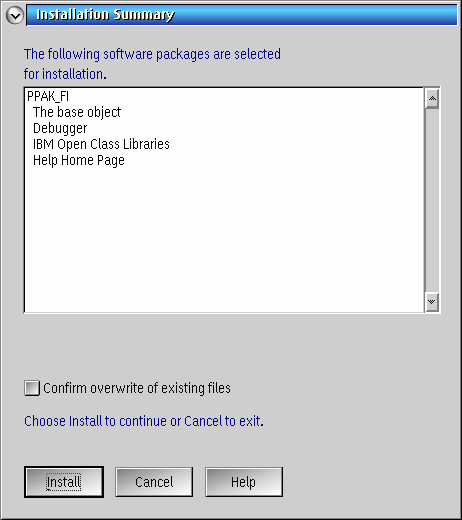
Figure 18. Installation confirmation dialog
This lists all of the components you've selected. (Notice in this example that I didn't select the Samples, the Open Class Source, or the OS/2 Toolkit; I don't need the first two for my purposes, and the Toolkit that comes with the C/C++ Compiler is outdated, so I'll install a newer version separately.)
The Confirm overwrite of existing files checkbox is useful if you're reinstalling the product over an existing copy. If you're installing to a new, empty directory, you can leave it un-checked.
Click on Install to continue with the installation.
Now, you remember that Media Path variable I mentioned earlier? I went and determined what it was, but when I was actually setting my variables, I neglected to modify it. So it's still pointing to the default value (in my case, that's H:\portapak\PortaPak-solution\media). As I mentioned, the CD-ROM drive letter (S:, in my case) gets substituted into that value, so Feature Install is now looking for the product files in S:\portapak\PortaPak-solution\media. Since it can't find them there, it now prompts me to enter the correct path:
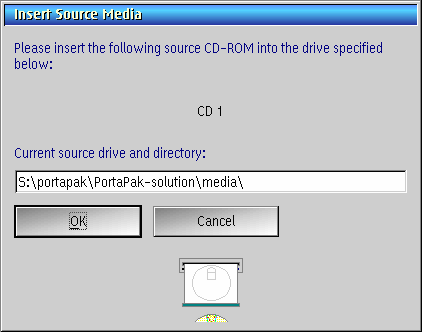
Figure 19. Dialog for source media path
So what path do I need to enter? Well, it should be the fully-qualified name of the directory where the original product definition response file was located. In the case of the C/C++ compiler, that's \COMPILER on the installation CD. So I type in S:\compiler and click on OK. The installation then proceeds normally.
While the product is installing, you see a progress display like this:
Figure 20. Progress display [Larger image]
And the following dialog, or something similar, appears when the installation completes:
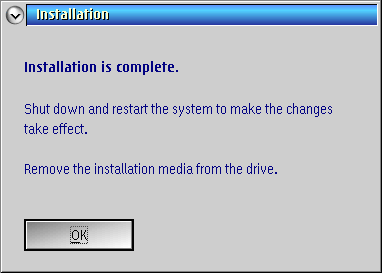
Figure 21. Installation completion dialog
If the product has a desktop folder, it should have been created.
Figure 22. Product desktop folder [Larger image]
So now we're all done! Reboot if required, and the product is ready to use.
By the way you can now delete the Install Object (PPAK_FI, in my example) since we're done with it. You can also delete any Setup String objects you created.
Closing Remarks
Feature Install is a remarkably flexible tool, and you can do a lot with it. But I've found that most people are quite unaware of this.
I started writing this article shortly after returning from WarpStock 2004 where I had attended a class on VisualAge C++. A number of people had been having trouble getting VisualAge 4 installed since they didn't have Netscape on their systems. When I showed them how to install using Install Objects instead, several of them urged me to write a VOICE article describing the process in general. So that's what I've done.
However, there's lots more to Feature Install that I haven't touched on here. I'm hoping to write a few more articles in this series that describe some of these things.
If all goes well, the next installment discusses unattended (CID) installations using CLIFI in more detail. I'll also describe a couple of troubleshooting techniques for when you run into problems.


 Feature articles

